 |
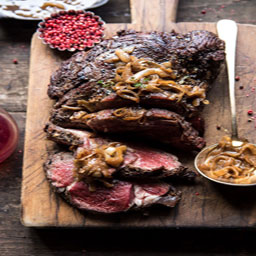
Savory, decadent, buttery, and so full of flavor...perfect for a very special night.
Prep Time 15 minutes
- Cook Time 1 hour - Total Time 1 hour 15 minutes
-
Calories 951 cal
Ingredients
- (4-5 pound) whole beef tenderloin
- 2 cloves garlic, minced or grated
- 2 tablespoons chopped fresh thyme
- 1/4 cup peppercorns crushed, or fresh black pepper (I use pink peppercorns)
- kosher salt
- 2 tablespoons butter
- French Onion Au Jus
- 4 large sweet onions,
- thinly sliced
- 6 tablespoons butter
- 1 1/2 cups red wine
- 1 cup beef broth
- 1 tablespoon Worcestershire sauce
- 4 sprigs fresh thyme
- Instructions
- Remove the meat from the fridge 1-2 hours before roasting. Preheat the oven to 475 degrees F.
- Rub the beef with garlic, thyme, and season generously with peppercorns and salt. At this point, the meat can be stored in the fridge up to overnight. Bring the meat to room temperature before cooking.
- Arrange the onions in a large, oven safe skillet. Place the beef over the the onions. Add 2 tablespoons butter to the top of the beef. Transfer to the oven and roast until the beef registers 120 to 125 degrees F for medium-rare, for rare about 35-45 minutes, depending on the size of your roast. It's best to use a meat thermometer.
- Remove the beef from the skillet to a serving plate and cover with foil. Let rest 10 minutes before slicing.
Meanwhile, set the skillet with the onions over medium heat. Add 6 tablespoons butter and cook, stirring frequently, until the onions are deep golden in color and caramelized, 5-10 minutes. Add the wine, beef broth, Worcestershire sauce, and thyme. Increase the heat to medium-high and bring to a simmer. Remove the thyme sprigs. Season to taste with salt and pepper.
|
Roasted Beef Tenderloin with French Onion Au Jus
|
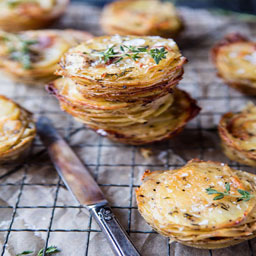 |
These crispy cheesy potatoes stacks are the most amazing compliment to any main. They’re crisp on the edges, soft in the center, just a little bit cheesy (but not overwhelmingly so), with the right amount of salty flavor, and oh so buttery! Honestly, this is what I call the perfect savory side dish. My mom says you can’t even call them a side dish…she ate them exclusively as a meal…and loved every bite!
No one and I mean NO ONE, can resist these cut stacks. Just like french fries, these stacks are addicting, you may just end up like mom, eating potatoes for dinner. They are seriously that good. I’ve decided that whoever came up with the idea to very thinly slice potatoes, layer them together and then bake them with things like butter, cheese and thyme is just a genius. It’s the best combo! And while they do have simple flavors, they’re flavors that pretty much everyone loves. I mean, I know everybody in MY family is crazy for anything with potatoes, cheese and salt. I have some seriously picky eaters to work with and this is about as far as some siblings flavor pallets will go. Yikes!
Ingredients
- 4 medium Russet or Idaho potatoes cut into 1/8 inch thick slices
- 1/4 cup chopped fresh oregano
- 2 tablespoons chopped fresh thyme
- 1 stick butter melted
- kosher salt and pepper
- 1/2 cup grated Asiago cheese
- 1/2 cup shredded sharp cheddar
Instructions
- Preheat the oven 400 degrees F. Lightly grease a 12 cup muffin tin.
- Cut the potatoes using a mandolin.
- In a medium bowl, toss together the potatoes, oregano, thyme, butter. , salt and pepper. Add the cheese and toss again. Layer the potatoes evenly among the prepared muffin tin, stacking the layers all the way to the top. The potatoes will shrink down as they cook.
- Cover with foil and place on a baking sheet.
- Transfer to the oven and roast for 30 minutes.
- Remove the foil and continue cooking another 20-25 minutes or until the potatoes are tender and golden. Run a butter knife around the edges of each stack to release them.
- Serve immediately, sprinkled with a little sea salt.
Be covered with foil when reheating or leave uncovered? And reheat in the muffin tin? Thanks, they look amazing!
that good. I used 1 large russet potato and 3/4 of a stick of butter along with dried herbs. I didn’t have fresh but I have to say it was amazing! I had some green onions so I cut them really small and added them to the mix.
They were almost too crispy the first night so tonight I am cooking them at 380 degrees. Once they were done I put them on a paper towel to soak up some of the butter. Absolutely delicious! The asiago cheese makes them salty but too much.
I plan on making them as an appetizer with a little sour cream on top. Loved!!! 4-5 potatoes man they were good and now I’m craving them again!
|
Crispy Cheesy Potato Stacks
|
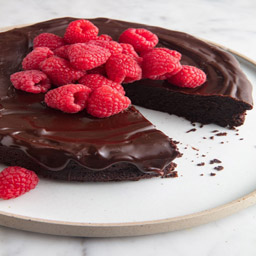 |
The best part about this flour less cake is that it doesn't require any flour alternatives. It's just the perfect cake that happens to have zero flour. Cocoa powder and eggs give it all the lift and structure it needs. It's the perfect thing to bake for your Valentine or for yourself on a Wednesday night.
Ingredients :
For the cake
- Cooking spray, for pan
- 6 oz.
bittersweet chocolate, roughly chopped
- 1/2 c.
(1 stick) butter, cut into large chunks
- 1 tsp.
instant espresso powder
- 1/4 c.
hot water
- 1 c.
sugar
- 4
large eggs
- 3/4 c.
unsweetened cocoa powder (preferably Dutch process)
For the ganache
- 1/2 c.
heavy cream
- 1 c.
semisweet chocolate chips
- Raspberries, for serving
Directions
Preheat oven to 350° and grease an 8" springform pan with cooking spray.
Make cake:
- Place a small saucepan filled halfway with water over medium heat and bring to a simmer.
- Place bittersweet chocolate and butter in a heatproof bowl and set over the simmering pot.
- Stir until chocolate and butter are completely melted.
- Turn off heat and remove bowl from saucepan.
- Dissolve espresso powder in hot water.
Add sugar and espresso to melted chocolate and whisk until completely combined then add eggs and whisk to combine.
Stir in cocoa powder.
- Pour batter into prepared springform pan and bake until just set in the middle and a thin crust forms, about 35 minutes.
- Let cake cool for 15 minutes, then remove sides of spring form pan. Let cake cool completely.
- Meanwhile, make ganache: Place heavy cream in a small saucepan and bring to a simmer.
- Place chocolate chips in a heatproof bowl then pour hot cream over chocolate chips. Let sit 1 minute, then whisk to combine.
- Pour ganache over cake and smooth with an offset spatula. Place in refrigerator until set, 10 minutes.
- Serve with raspberries.
|
Flour less Chocolate cake
|
 |
Recipe courtesy of Sunny Anderson
Ingredients
Salt
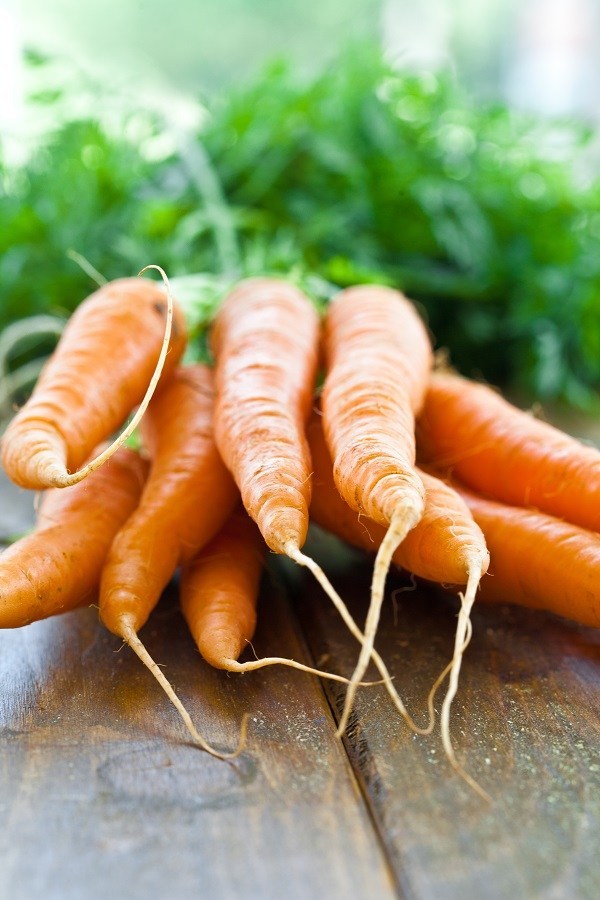
1 pound baby carrots
2 tablespoons butter
2 tablespoons honey
1 tablespoon lemon juice
Freshly ground black pepper
1/4 cup chopped flat-leaf parsley
In a medium saucepan, bring water to a boil. Add salt and then carrots and cook until tender, 5 to 6 minutes. Drain the carrots and add back to pan with butter, honey and lemon juice. Cook until a glaze coats the carrots, 5 minutes. Season with salt and pepper and garnish with parsley.
|
Honey Glazed Carrots
|
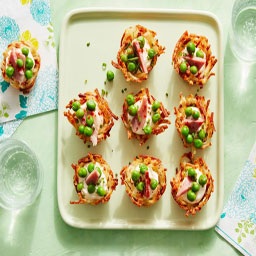 |
This elegant appetizer comes together easily with simple, time-saving ingredients. Frozen hash browns are pressed into mini muffin tins and baked into crispy nests filled with ham, lemony cream cheese, and peas. Serve them at your Easter dinner or spring cocktail party.
Ingredients
- Nonstick cooking spray
- 2 thick slices deli ham (about 4 ounces total)
- 16 ounces (about 3 1/2 cups) frozen shredded hash browns thawed (about half of a 30-ounce bag)
- Kosher salt and freshly ground black pepper
- 8 ounces cream cheese, at room temperature
- Finely grated zest of one lemon
- 2 tablespoons milk
- 1/4 cup frozen peas
- 2 tablespoon chopped chives (1/2-inch pieces)
- Paprika, for serving
Special equipment:
one 12-cup mini muffin tin and one 24-cup mini muffin tin
- Position two racks in the top and bottom thirds of the oven and preheat to 425 degrees F. Spray a 12-cup and a 24-cup mini muffin tin with cooking spray and set aside. Cut the ham into small matchsticks similar in size to the hash browns. Set aside and reserve 1/3 cup of the ham. Mix the remaining ham, hash browns, 1 teaspoon salt and some pepper in a large bowl. Divide the mixture evenly among the sprayed cups, using about 1 rounded tablespoon each. Press the mixture in a thin layer across the bottom and up the sides of each cup to make a nest, leaving the edges uneven and jagged.
- Bake, rotating the pans halfway through, until the nests are dark brown around the tips and golden and crisp on the outside, about 25 .
- Meanwhile, beat the cream cheese, lemon zest, milk 1/2 teaspoon salt, and some pepper together in a medium bowl with an electric mixer on medium-high speed. Scrape the mixture into a resealable plastic bag, cut off the tip and set aside.
- Meanwhile, beat the cream cheese, lemon zest, milk 1/2 teaspoon salt, and some pepper together in a medium bowl with an electric mixer on medium-high speed.
- When the nests are ready, remove them from the oven and let sit until they are cool enough to handle, about 10 minutes.
- Carefully lift the nests out of the tins using a small offset spatula or butter knife and transfer to a cookie sheet.
- Pipe the filling evenly among the nests.
- This may be done ahead; the nests can be set aside at room temperature until ready to serve, up to two hours.
- When ready to serve, heat the filled nests until the cream cheese is warm and the potatoes are crisp, about 7 minutes.
- Meanwhile, bring a small pot of water to a boil.
- Add the frozen peas and cook until they are warm but not shriveled, 5 to 6 minutes.
- Drain the peas in a colander, shaking to remove excess water.
Transfer the nests to a serving platter. Top each with 1/4 teaspoon of the reserved ham, 3 peas and about 1/4 teaspoon chopped chives. Sprinkle with paprika and serve immediately.
|
Potato Nests with Peas, Ham and Cream Cheese
|
 |
Ingredients
Pastry:
- 1 1/2 cups all-purpose flour
- 2 tablespoons sugar
- Pinch kosher salt
- 1/2 cup (1 stick) unsalted butter cold, in chunks
- 1 large egg, separated
- 2 tablespoons ice water, plus 1 teaspoon
Filling:
- 4 large eggs
- 1 1/2 cups sugar
- 1 cup fresh lemon juice (about 5 lemons)
- 1/4 cup heavy cream 1/4 cup heavy cream
- 1 lemon, zested
- Pinch kosher salt
- 1 pint blueberries
To make the pastry:
- Pulse the flour, sugar, and salt together in a food processor.
- Add the butter and pulse until the dough resembles cornmeal.
- Add the egg yolk and 2 tablespoons ice water and pulse again until the dough pulls together.
- Wrap the dough in plastic wrap and let it rest in the refrigerator for 30 minutes.
- Roll the dough out on a lightly floured surface into a 12-inch circle.
- Roll the dough up onto the pin and lay it inside a 10-inch tart pan with a removable bottom.
- Press the dough into the edges of the pan and fold the excess dough inside to reinforce the rim.
- Cover the tart pan with plastic wrap and put it into the refrigerator for another 30 minutes to rest.
To bake the shell:
- Heat the oven to 350 degrees F. Put the tart pan on a baking sheet and prick the bottom of the dough with a fork. Cover he shell with a piece of parchment paper and fill it with pie weights or dry beans. Bake for 25 minutes.
- Remove the parchment and weights. Lightly beat the egg white with 1 teaspoon water and brush it onto the bottom and sides of the tart shell; set aside to cool.
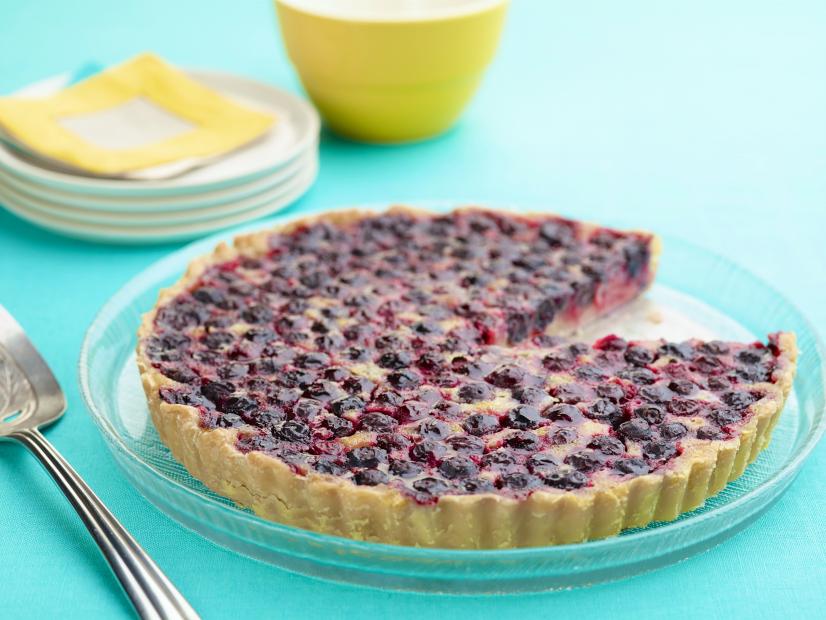
- Whisk together the eggs, sugar, lemon juice, cream, zest, and salt. Add the blueberries to the cooled tart shell and pour the filling over the blueberries. Bake for 20 to 25 minutes.
The curd should jiggle slightly when done. Cool to room temperature, remove from the tart ring, and serve
To bake the shell, heat the oven to 350 degrees F.
- Put the tart pan on a baking sheet and prick the bottom of the dough with a fork. Cover the shell with a piece of parchment paper and fill it with pie weights or dry beans. Bake for 25 minutes. Remove the parchment and weights. Lightly beat the egg white with 1 teaspoon water and brush it onto the bottom and sides of the tart shell; set aside to cool.
- Whisk together the eggs, sugar, lemon juice, cream, zest, and salt. Add the blueberries to the cooled tart shell and pour the filling over the blueberries. Bake for 20 to 25 minutes. The curd should jiggle slightly when done. Cool to room temperature, remove from the tart ring, and serve.
|
Blueberry-Lemon Tart
|
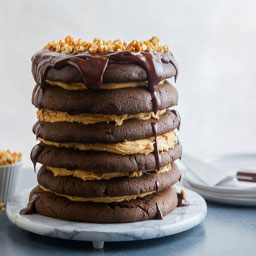 |
Can't decide between cookies and cake? Oversized, double-chocolate cookies stacked between layers of peanut-butter frosting create an indulgent dessert that doesn't
Level: Easy
Total: 2 hr (includes cooling and setting times)
Active: 1 hr
Yield: 10 to 12 servings
Ingredients
- Cookies:
4 1/2 cups all-purpose flour (see Cook's Note)
- 2/3 cup unsweetened dark cocoa powder
- 2 teaspoons baking soda
- 2 teaspoons fine salt
- 3 sticks (24 tablespoons) unsalted butter, at room temperature
- 3 cups packed dark brown sugar
- 4 large eggs
- 2 teaspoons pure vanilla extract
- 3 cups semisweet chocolate chips
- 1/2 cup honey-roasted peanuts, chopped
Frosting:
- 2 sticks (16 tablespoons) unsalted butter, at room temperature
- 1 cup smooth peanut butter
- 1 cup smooth peanut butter
- 2 cups confectioners' sugar
- Chocolate Ganache:
- 4 ounces semisweet chocolate, finely chopped
- 1/3 cup heavy cream
- 1 tablespoon unsalted butter
- Preheat the oven to 375 degrees F.
For the cookies:
- Whisk together the flour, cocoa powder, baking soda and salt in a large bowl. Beat the butter and brown sugar with an electric mixer on medium-high speed in a second large bowl until light and fluffy, about 6 minutes.
- Add the eggs to the butter mixture, one at a time, beating after each addition to incorporate; beat in the vanilla. Reduce the speed to medium, add the flour mixture, and beat until just incorporated. Fold in the chocolate chips by hand.
Roll the dough into 6 balls (about 1 1/2 cups each). Divide 4 of the balls between 2. rimmed baking sheets (2 balls per sheet).
- Flatten them into 6-inch circles using your hands; make sure the circles are 2 inches apart. Bake until just set, 12 to 14 minutes. Let cool on the baking sheet for 10 minutes, then transfer to a rack to cool completely. Repeat with the remaining 2 balls of dough.
For the frosting:
- Meanwhile, beat the butter and peanut butter with an electric mixer on medium speed in a large bowl until light and fluffy. Slowly add the confectioners' sugar about 1/2 cup at a time, beating between additions, until
incorporated.
- Assemble the cake: Place a cookie on a cake stand or serving plate and spread the top with some frosting. Top with another cookie and more frosting; repeat with the remaining cookies and frosting, making sure the frosting on the top layer is spread smooth.
- For the ganache: Put the chocolate in a medium bowl. Bring the cream and butter to a boil in a small saucepan over medium heat. Pour over the chocolate and let stand for 5 minutes; stir until melted and smooth.
- Pour the ganache over the top of the cake, smoothing the top with a small offset spatula and letting it drip over the sides. Decorate the rim of the cake with the peanuts. Let stand at room temperature until the chocolate hardens, about 10 minutes.
Cook’s Note
When measuring flour, we spoon into a dry measuring cup and level off the excess. (Scooping directly from the bag compacts the flour, resulting in dry baked goods.)
|
Giant Chocolate-Peanut Butter Cookie Cake
|
 |
- 2 racks lamb, 6 to 8 ribs each, approximately 1 1/2 to 2-pounds each
- 1 tablespoon olive oil
- 1 teaspoon kosher salt
- 1/2 teaspoon freshly ground black pepper
- 6 cloves garlic, minced
- 4 teaspoons fresh thyme, chopped
- 1 1/2 teaspoons ground coriander
- 1 to 1 1/2 tablespoons sherry vinegar
- 1/2 to 1 teaspoon Dijon mustard
- 1/2 to 1 teaspoon chopped fresh rosemary leaves
Preheat the oven to 375 degrees F.;
To french the racks of lamb:
- Make a cut on the fat side of the ribs, perpendicular to them, about 2 1/2-inches down from the rib ends
- Cut through the fat down to the rib bones.
- Turn the rack on end, with the bones facing up and push a knife through the flesh between each rib, using the initial cut as a guide for the knife.
- Cut down the side of each rib to remove the excess fat in between each rib.
- Using strong kitchen twine, wrap the twine around each rib at the base, nearest the meat and pull to remove all of the remaining fat and sinew from the rib bone.
- Bend each rack into a semicircle (meat side in and fat side out) and using kitchen twine tie them together at the base and center, in order to hold the racks together.
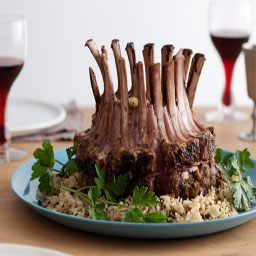
- The rib ends should be pushed outward to create the look of a crown. Rub the lamb with the olive oil.
- Combine the salt, pepper, garlic, thyme and coriander and press all over the lamb.
- Place the roast in a Bundt pan with the center of the pan coming up through the middle of the roast.
- Place on the middle rack of the oven and cook for 30 to 35 minutes, until the meat reaches an internal temperature of 130 degrees F.
- This is approximately 8 to 12 minutes per pound. Remove from the oven, transfer the roast to a rack, cover with aluminum foil and let the meat rest for 20 minutes.
- While the meat is resting add the sherry vinegar, mustard and rosemary to the juices that accumulated in the Bundt pan while cooking.
- Stir to combine.
- Taste and adjust seasoning, as needed. Cut the string away from the roast and place cooked stuffing, rice or barley in the center if desired.
- Serve the warm sauce with the roast.
|
Crown Roast of Lamb
|
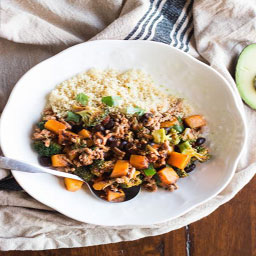 |
Enchiladas are technically made with tortillas and lots of cheese, something this dish is not, but it still encapsulates the great smoky, spicy, sweet nature of the classic version. This Ground Turkey Enchilada Stir-Fry with Couscous meshes togethers the fresh flavors of butternut squash, broccoli, black beans and salsa with the richness of whole wheat couscous and a premade enchilada sauce. Serve with a garnish of cilantro, fresh lime juice, diced avocado and a bit of shredded cheese for maximum enchilada feels.
Ingredients
- 1/2 cup whole wheat couscous
- 1 pound lean ground turkey
- Salt and freshly ground black pepper
- 1 teaspoon olive oil
- 2 cups butternut squash, peeled, seeded and diced
- 1 cup broccoli florets
- One 15-ounce can no-sodium-added black beans
- One 10-ounce can enchilada sauce
- 1/2 cup salsa
Pour 1/2 cup of water into a small saucepan and bring to a boil over high heat. Pour the couscous into the saucepan and stir well. Turn off the heat, cover and let stand 5 minutes. Fluff with a fork and set aside. Meanwhile, in a large skillet or wok, cook the ground turkey over medium heat, breaking it up with a wooden spoon, until cooked through and browned, about 5 minutes. Sprinkle with some salt and pepper. Transfer to a bowl and set aside. Drain the excess fat and wipe the pan clean. Heat the oil in the same pan over high heat, then add the squash and cook, stirring occasionally, until browned and softened, 8 to 10 minutes. Add the broccoli and cook, 3 to 5 minutes more. Add the turkey, beans, enchilada sauce and salsa and stir until all the ingredients are well combined. Serve with couscous if desired.
|
Ground Turkey Enchilada Stir-Fry with Couscous
|
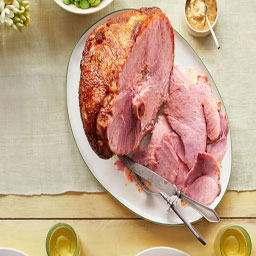 |
Ingredients
- 1 18- to 20-pound water-added smoked ham, hock removed
- 2 cups light brown sugar
- 1 cup clover honey
- 1 cup country dijon mustard (or 1/2 cup each regular dijon mustard and mayonnaise)
Directions
- Adjust the oven racks to accommodate a large roasting pan and preheat the oven to 350 degrees F. Fit the pan with a shallow rack.
- Unwrap the ham and rinse it in cold water. Place it on the rack in the roasting pan. Cover the pan with aluminum foil, leaving a 2-inch opening to allow steam to escape. Bake the ham for half the estimated cooking time, about 3 hours. (Total cooking time is about 20 minutes per pound.)
- Add the brown sugar and honey to a saucepan and cook over medium heat until the mixture is smooth and the sugar is dissolved. Remove from the heat and stir in the mustard.
- Pour the mixture over the ham. Continue baking the ham, uncovered, basting occasionally with the drippings in the roaster, for the remaining time, about 3 more hours. Check for doneness by inserting a meat thermometer into a meaty part of the ham, avoiding any fat or bone. The thermometer should register 160 degrees F.
- Allow the ham to stand 15 minutes before slicing. This allows the juices inside the ham to set.
|
Honey Mustard-Glazed Ham
|
|